How to create and then embed your Facebook Pixel into your website
/
I have included some straightforward steps in the blog post below that will outline how you create your Facebook pixel and then embed it into a variety of website platforms, lead page programs and educational member sites.
I hope you find this useful.
How to create your Facebook pixel if you just use Ads Manager

- Go to your Facebook Pixel tab in via Ads Manager.
- Click Create a Pixel. Enter a name for your pixel. You can have only one pixel per ad account, your page name is best.
Note: You can change the name of the pixel later from the Facebook Pixel tab. - Check the box to accept the terms.
- Click Create Pixel.

Important: If you've created a Custom Audience pixel in the past, you have an older version of the Facebook pixel and won't see an option to create another. However, we strongly recommend that you update to the Facebook pixel base code and add its event codes to access all the products that can help your business.
How to create your Facebook pixel If you use Business Manager
The steps are the same - except you will be working inside your Business Manager Tabs.


How to add the Facebook pixel to your website
- To add the pixel code to your website:
- Go to your Facebook Pixel tab in Ads Manager
- Click Actions > View Pixel Code
- Click the code to highlight it
- Right-click and select Copy or use Ctrl+C/Cmd+C
- Click Done
- Go to your website's HTML and paste the code.
VERY IMPORTANT
It needs to go on every single page of your site
If your website runs on BigCommerce, Shopify, Magento or Instapage, then you can just embed your pixel ID into the appropriate area, without needing to touch any code. Otherwise you will need to copy and past the full code into your website itself (this includes if you are using Google Tag manager to manage any of your code snippets). This is also the case for MANY other tools you may use with your website in particular lead page tools like lead pages or education platforms like Thinkific
If you're using third-party publishing or ecommerce platforms, you may not be able to edit the website's code to add the pixel. So you will need to check with your website/provider to see what their policy is.
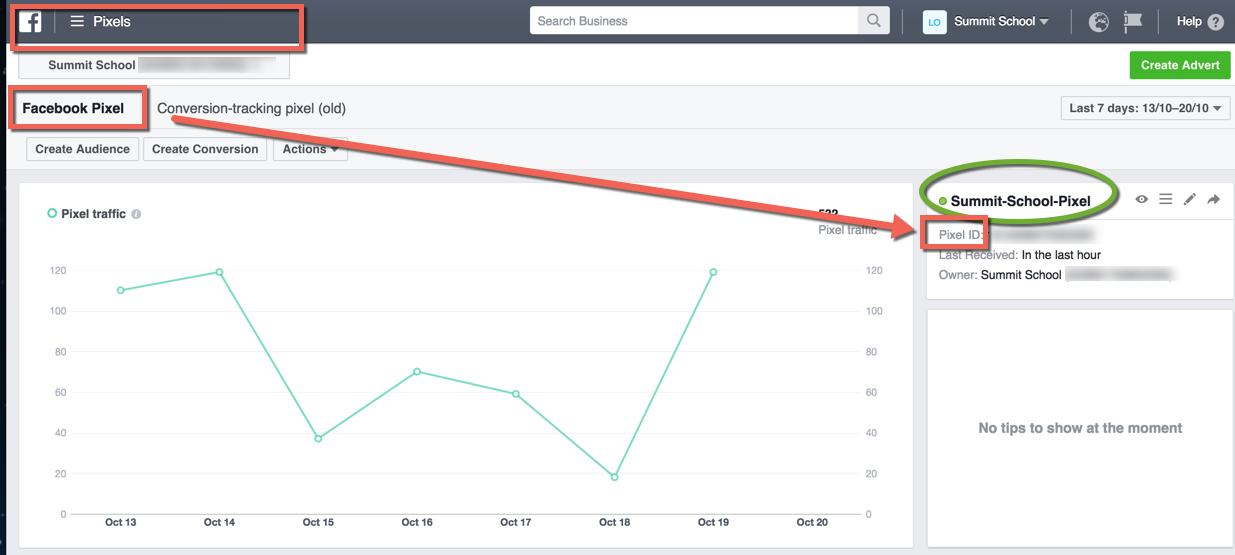
Finding your Pixel ID for simple integrations
You can see your Facebook pixel by looking in the right hand corner of the Pixel tab within Ads Manager or Business Manager. See in the screenshot below.
Facebook partner integrations
If your site runs on one of the partners listed below, then you can take advantage of automatic integration features to simplify your pixel installation.
BigCommerce:
- Go to your Facebook pixel tab in Ads Manager/Business Manager.
- Copy your Pixel ID from the summary area on the right.
- Log in to BigCommerce.
- Select Advanced Settings and choose Web Analytics.
- Note: In some versions of the control panel, Web Analytics is under Setup & Tools.
- Check the box next to Facebook Pixel.
- Click Save.
- Select the Facebook pixel tab.
- Type in your Facebook Pixel ID under Settings.
- Click Save.
Magento:
- Visit Magento Connect and click Install Now.
- Check the box to accept the extension license agreement, and click Get Extension Key.
- Copy the Extension Key.
- Log into your Magento Admin Panel.
- Click Magento Connect under "System" and choose Magento Connect Manager.
- Paste your Extension Key URL in the "Install New Extensions" section.
- Click Install.
- Click Proceed. You should now see a message that says "Installed successfully" in the console at the bottom of the page.
- Return to the Magento Admin Panel and click Facebook Ads Extension.
Shopify:
- Go to your Shopify admin area and log-in
- Select Online Store and choose Preferences.
- In the Facebook pixel section, enter your Facebook pixel ID.
- Click Save.
Instapage:
- Choose the appropriate landing page, go into Settings
- Click on Analytics
- Enter in your Facebook Pixel ID
- Click Done and then Publish.
Most platforms require you to copy and past in the Facebook pixel code.
Some common website, lead page and training platform instructions are listed below. If your website allows you to edit its code, you should paste the pixel between the<head> and </head> tags of the page you want to track.
Review the list below to find your site/platform.
- Open your Google Tag Manager.
- Select your website's container, then click Add a new tag.
- Click Custom HTML Tag.
- Give it a name ie Facebook Pixel
- Copy the entire pixel base code and paste the code in the HTML container.
- Click the Advanced Settings dropdown and select Once per page under Tag firing options.
- Under Fire On, select All Pages.
- Click Create Tag.
Squarespace:
- In the Home Menu, click Settings > Advanced.
- Click Code Injection.
- In the header box, paste your Facebook pixel base code.
- Click Save.
You can also add the purchase standard event code to the Order confirmation page box or add specific events to certain pages by using the Page Header Code Injection function.
To do this:
- Open the page while in the Pages panel.
- Hover over the content area and click Settings.
- In the Page Settings window, click Advanced in the top-right corner.
GoDaddy:
- Log into your Website Builder account.
- Click Edit Site.
- Click the three-bar icon in the top-right corner of your screen and select Site Settings.
- Select Site-wide Code.
- Paste the pixel code between the <head> tags.
- Click OK and close the Site Settings window.
- Click Publish.
ClickFunnels
- Go into the editor for the page you want to add the tracking pixel to
- Select Settings then Tracking Codes.
- Next just paste your tracking pixel code into either the Header
LeadPages:
- From your admin page, click Lead Page Options > Tracking Codes .
- In the Head-Tag Tracking Code box, paste the facebook pixel code.
- Click Done.
- Click Publish.
Teachable
- Log in to your Teachable school as an admin.
- Choose “Site”, then “Head Includes
- Scroll down past “CSS Includes” and insert the pixel code you’ve copied before.
- Save
- Install the Facebook pixel helper extension in Google Chrome.
- Navigate to your school’s starting page using Chrome to verify your pixel is working
Thinkific
You're able to install the Facebook tracking pixel on your site in two easy steps!
- Copy your Facebook Pixel code
- Install it into Thinkific via Integrations > Facebook on your Thinkific admin dashboard.
Weebly:
- Click Embed Code and drag it to the top of the page.
- Click Edit Custom HTML
- Paste the facebook pixel code in this space
- Click Publish.
Wix:
- Edit your website.
- Create an HTML box
- Paste the pixel code into the text box and click Update.
- Drag the HTML box to attach it to the header at the top of the page.
- Save and publish.
Wordpress:
Note: The pixel is available only on self-hosted Wordpress.org sites, not Wordpress.com sites.
- Install the Insert Headers and Footers plugin.
- From the Settings section, click Insert Headers and Footers.
- Paste your pixel code in the Scripts in Header box.
- Click Save.
Can't see your platform? Let me know and I will find the details and include them here!