What the font...! You need a brand kit
/
How many times have you scratched around for your logo to give to a printer? Only for them to say, I need the eps version.
What about when you want to create a graphic to use in social media or advertising and you are not sure what colour purple you need for your call to action buttons? What about what font you use? And don’t get started on the kind of images you might choose..
Sound familiar? Wouldn’t it be better if it was easy.
Everything in life can be easier when we are organised before we start.
As small business owners, this can be so much easier if you have what is called a branding kit, just sitting in your top draw or more correctly on your network, inside dropbox or google drive.
Often larger businesses have these, you may even have heard them called a style guide - but a branding kit or brand book actually is a little bit more powerful and alot more useful in your day to day digital marketing activities.
Said branding kit will have ALL the tools that you need to make design decisions around your business - it will even help with your content marketing decisions.
Before you start building up your brand kit however there are few things you need to do, I blogged about a few of them just recently - dream client and brand personality.
In addition to understanding them, you also need to have a good clear handle on your mission & vision (yes you do and if you didn’t already had that, you wouldn’t have been able to define your target client or brand personality) You also need to understand your core values.
All of these items together are the foundation of your brand and how you present yourself to the world and how you want people to respond to you.
If these are clear - then we can begin what we need to put into our branding kit.
So let’s dive in and see what you need in your kit.
1. Brand Story
This is where all the vision stuff goes. This is not fluff, this is important as it helps you set direction not only for you, but for your team, people that you may outsource work to as well as your customers. It is up to you how much of this you make public but having this all together will help keep you clear on your business objectives.
Vision & Mission: Write this down. You need to be able to articulate this simply. It does not have to be “World Peace” but your vision & mission simply put for your business
Target Audience: Remember my post on your dream client. This is where you put that information. Everyone is not your client, when we try and talk to everyone, we end up talking to noone
Brand Personality: You can find out more about how to define your Brand personality here. Again, knowing how you walk and talk as a business, creates so many shortcuts in the future for you, in particular your social media posts and content marketing efforts.
Core Values: Your why, what drives you as a business person. If you have a team around you, understanding your core values will help your team no only create marketing that is true to your brand - but they will act in a way that is in full alignment with your vision and values.
2. Logo
When you get your logo designed, you need to make sure that you get all possible file versions of your logo in that package. If you are using a service like Fiverr or 99Designs, make sure that these versions are included in your price.
Examples of Use: Have examples of how to use or not use your logo.
Size: List minimum size and proper proportions.
Space: If logo requires a certain amount of white space around it, spell that out.
Colors: Show variations (reversed, in color, black and white) and when to use them.
Orientation: Can you logo be used horizontally, vertically, stacked. Have visual examples of these.
“Pro TIP: Invest in proper logo development”
3. Colours
Colours that you will use at your site and in your marketing material will come from your logo. However you may also introduce a contrast colour for use with call to action buttons or other styling features that you choose to use for your social media posts.
Normally you will be advised the colours by your graphic designer and they are often in RGB or HEX format ( or both ). CMYK or Print colours are often also included ( very handy if you will be getting promotional materials made up. You may often also be given the appropriate PANTONE code.
Note for any web work, working inside CANVA or Photoshop, having access to the HEX codes will be the easiest. For example my colours are
Purple: 5e0d8b
Teal: 00afaa
Yellow: ffce00
Grey: 7d868c
Canva for Work is a great place to store these colours if you have access to that program, otherwise, keep your colour codes handy. It will save hours of time.
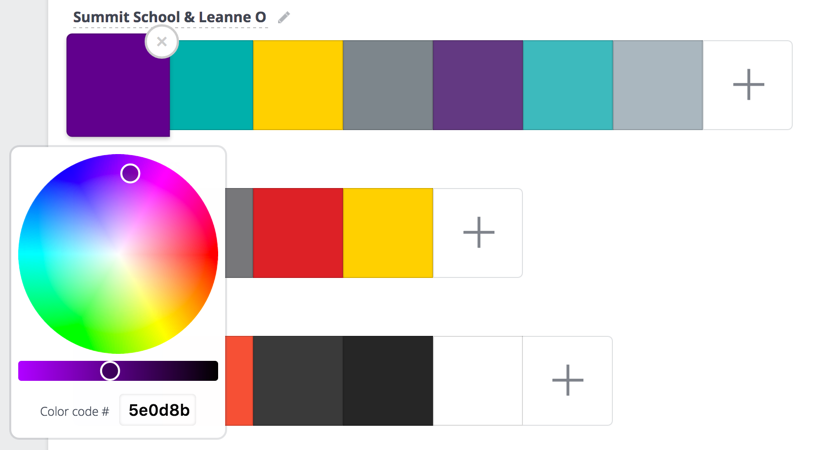
Canva for Work sample of the brand kit area
If you need to include some contrast colours and are unsure what is a good fit, this website below is fantastic for that option. Not only can you find contrasting colours to suit say a call to action button, but you can also find complementary colours that flow smoothly from your main choices. Canva also has some great palette choices to also guide you.
Colour Calculator - https://www.sessions.edu/color-calculator/
Canva Colour Palette’s - https://designschool.canva.com/blog/brand-color-palette/
I personally love the psychology behind colour choice, this article below is a great starting point for understand why we choose the colours we do and what they mean. Whilst it is speaking from the decoration space, this article is useful for any one interested in effective colour choices.
The meaning of colour: https://www.jenreviews.com/color-meaning/
4. Font
Consistency in font choice is so critical to successful branding. Don’t be tempted to mix it up to follow the latest design fad. If you are not a designer ( and if you are reading this blog post, I can safely assume that you aren’t!) it is better to stick with the fonts that again will come from your logo or the best fit with your logo, if the logo has utilised a custom font.
Canva has a helpful tutorial here on font combinations if you are doing this yourself, but just knowing what font you are meant to be using is critical.
Canva for Work help - https://designschool.canva.com/blog/canva-for-work-brand-fonts/
Also, try and use a web safe font, or one from Adobe TypeKit or Google Fonts, so that when creating new website content, people will see your content in the way you intended. Not all fonts work on websites they way you might hope. You may may need to list some alternatives that are a really close match. For example, I tend to use Lato for for some of my landing pages, as I am not able to use my standard website font of Avenir Next LT Pro, which I save for graphics
You also need to spell out the following
- Font for H1, H2, H3
- Font for normal text
- Rules around italics
- Font for contrast text
- Font for call to action text
5. Imagery
The kinds of images that you want to use at your website, will be something you dive into time and time again. So it is worthwhile not just building up a bank of them - but also finding images that reflect a certain style, look or feeling. For example, I often use images of people trekking mountains or walking outside. This goes with the theme of my brand Summit School with Leanne O - taking people from basecamp to the summit of their digital marketing journey. So I look for images that describe that. I often draw on images that support that, things like compasses, signposts, hiking boots etc.
My social media posts however don’t always follow that theme, as they often are images that are more tied to what I might be elaborating about on the blog. However in this area, I tend to source images that have a strong tie to my colour palette. Go to my instagram feed now and see what I mean. I often have a series of images that are purple, or teal, grey or yellow. These images as well as being in those colour tones, will be the images that I know will connect with my target client.
You can and should store a bank of images that reflect the kind of images that you like. This will help your team and you, create future campaigns that are a fit with your brand personality as well as what will resonate with your target customers.
6. Voice
Remember back to your brand personality exercise, one of the key points was to describe in words the kind of business that you are. You find that now you are putting your brand kit together you may discovery a whole host of words/adjectives that you can use in your social media and content marketing activities.
You may have a tag line that you have had created, or wish to use.
Include all of these words and phrases in this part of the branding kit to use over and over again. You want to reinforce your branding message every chance you get.
7. Social Media Channels
What’s your Facebook page url? What about your LinkedIn profile link?
If you have a busy business name, remembering your social media URL’s can be a little tricky, we don’t all have the luxury of being called Apple.
Keep a list of these handy, as well as icon images of all the Social Channels that you are active in
8. Headshots of you and your team
Get professional team photos done ( or of just you ) and store them in your branding kit space. Include shots of you going about your work, as well as front to camera. If you are not sure when you might be able to secure these ( as budgets tend to drive some of this work) make sure you save ideas in this section of what you are looking to have done.
For example, I have had some notes saved of some profile shots I wish to have taken of me, holding a white board up at varying angles, as well as images of be pointing at the air - ready for graphics to be created later.
9. Templates
This is where you might want to store all your other templates that you may choose to use in your business. Not only things like letterhead, business cards, but also invoices, email newsletters, social media post layouts, Pinterest images, blog post images, email newsletter images and email signatures.
You may not choose to have many things inside here - but if you can start to build up this library, going forward this will save you hours of time explain to people who to do things.
10. Storage
Where is the best place to put this? In the cloud is best, wherever you can access it at any time. I use Google Drive to store all of my documents - but you want to store items at DropBox. You may store some of your image ideas inside a private Pinterest board. You may simply just store all of this information on your network at work.
But wherever you put it - make sure it is accessible everyone to find. Make sure each section of your branding kit is clearly labelled and grouped accordingly and then tell everyone where everything is.
Not sure you have included everything you need? I have got you covered.
I have created a handy checklist so that you can work through all the key items you might need to for your business. Click the image below to signup and receive the brand kit checklist now.